Blog Post 003 - Self Host Your Website With Github Pages and Hugo
Self Hosting Made Simple

Everyone wants a cool website to show off their work or post blogs (like me) but nobody wants to get looped into the endless subsription fees. Most people end up paying a subsription fee to a domain provider, access to cool website templates(if you don't know what you're doing), extra cloud storage, paying for community add-ons, paying for analytics etc. Before you know it your silly website is costing you $80 a month. People assume the only cheap alternative is using a free boring wix website but I'm here to tell you about the beautiful world of Hugo.
Are you more of a visual learner? No problem! A youtube guide will be posted soon for you to follow along! Links posted below :)
Requirements
- Homebrew
- Git
- Github account
- Hugo
- Custom Domain (optional)
Before we get started you will need the above downloaded onto your machine, for beginners it can seem intimidating but it's very simple to follow along. I will post an in depth blog that focuses on Git later on, for now you can follow these steps below to start self hosting your own website with Github pages and Hugo.
Homebrew
On your machine of choice, open a terminal and download Homebrew and wait for it to finish. This command can be ran on macOS, Linux or windows.
If you run into any issues please use Homebrew to follow their directions.
/bin/bash -c "$(curl -fsSL https://raw.githubusercontent.com/Homebrew/install/HEAD/install.sh)"
After it has finished downloading onto your machine run this command to upgrade outdated packages, update Homebrew, and remove any unneeded disk space from your machine:
brew upgrade
brew update
brew cleanup
Git
Now that you have Homebrew ready, this next part is easy. In your terminal run this command to install Git.
brew install git
Wait for Git to finish downloading, Git is used to keep track of all the changes made to your source code and I highly recommend getting comfortable with Git before continuing with this guide. Git will be used to push, pull, merge and make chnages to your source code so the better understanding you have of Git the easier everything will be. If you want to learn more about Git or if you run into any issues please use these links below to help you.
- Download Git Guide Book
- Git Command Cheat Sheet
- Git - Windows Download Help
- Git - macOS Download Help
- Git - Linux Download Help
Create your Github account
After Homebrew and Git have been installed, create a Github account. For all the newbies, Git and Github are not the same thing, Github does not own Git. Think of Git as version control history for your souce code and Github as the platform to access that version history information. I'm not an expert so if you are confused it's best to watch a few youtube videos on how Git and Github works. Github is not the only platform you can use but it will be the easiest to use if you're following along step by step. There's also platforms like Codeberg and Tangled or if you want to self host you can use Gitea, Forgejo, Gitlab etc. I personally also dabble with Codeberg, Tangled, and Forgejo.
Hugo
Once you have downloaded Homebrew, simply run this command:
brew install hugo
Getting Your Website Repo Setup
For beginners it will be easiest to go to Github and use the website interface to create your repo. If you are comfortable using the command line then feel free!
Once you have finished setting up your Github account, you will want to create your own "Repository" for your website. For this example I will use my Github username, replace my username with your Github username. Name this repo the following:
ooofruitsnacks.github.io
Make the visibility of the repo public.
You do not have to worry about adding a description, .gitignore or license for now. You can add all of that later.
Now we go to the command line... but don't be imtimidated I will guide you!
Remote into your freshly created repo:
Make sure to replace yourusername with your actual Github username.
git remote add origin https://github.com/yourUsername/yourUsername.github.io.git
Now you must create your website with Hugo, run this command to do so. We are going to be using the Archie theme in this example, feel free to change this if you are comfortable doing so.
hugo new project my-website
cd my-website
git init -b main
git submodule add https://github.com/athul/archie.git themes/archie
Add .gitignore to the repo:
cd my-website
touch .gitignore
[!TIP] IM USING NEOVIM (BTW) IN THESE EXAMPLES! USE WHATEVER TEXT EDITOR YOU ARE COMFORTABLE WITH! IF YOU DON"T KNOW THEN FOLLOW THESE STEPS FOR NVIM BELOW BEFORE CONTINUING!
NEOVIM TIPS FOR BEGINNERS
After opening a nvim session:
- Press A or I to insert into the document
- Paste the text
- Now press ESC to exit "insert mode"
- This seems weird I know, after pressing ESC type
:wq - Done, you can always re-run your
nvim example.mdto double check it saved, simply type:xto exit nvim after confirming
Okay we're done with neovim lol, now run:
nvim .gitignore
and paste this:
/public/
/resources/_gen/
/.hugo_build.lock
Now we need to configure your website layout, this is based off my layout, please make any changes you see fit to meet your needs:
[!NOTE] REMEMBER TO CHANGE THE URL TO YOUR GITHUB REPO NAME
baseURL = "https://yourUsername.github.io/"
languageCode = "en-US"
title = " Example Self Hosted Website"
theme = "archie"
copyright = "| a creative solution | Owen Edwards"

[pagination]
  pagerSize = 6

[params]
  mode = "dark"
  useCDN = false
  subtitle = "Example Self Hosted Subtitle"
  [params.author]
    email = 'your email address'
    name = 'Owen Edwards'

[[params.social]]
  name = "GitHub"
  icon = "github"
  url = "https://github.com/ooofruitsnacks"

[[menu.main]]
  name = "Home Page"
  url = "/"
  weight = 1

[[menu.main]]
  name = "Posts"
  url = "/posts/"
  weight = 2

[[menu.main]]
  name = "About Me"
  url = "/about/"
  weight = 3
Push to your repo now.
git add .
git commit -m "Create Hugo site with Archie theme"
git remote add origin https://github.com/yourUsername/yourUsername.github.io.git
git push -u origin main
Now add the Archie theme template:
git add themes/archie
git commit -m "Update Archie theme"
git push --set-upstream origin main
If you want to start posting blogs, you can do so by:
git submodule update --init --recursive
hugo new content posts/example01/index.md
Just change example01 with whatever the title of your blog post is, and then edit the index.md file with your blog content:
cd my-website
cd content
cd posts
cd example01
nvim index.md
after you have made all your changes you want to include simply push them to your repo:
git add .
git commit -m "example01 post"
git push origin main
If branches ever get mixed up or you don't know what to do simply run:
git pull
and
git merge origin/main --allow-unrelated-histories -m "Merge GitHub repository with local Hugo site"
Now that you have that all setup, make sure to mess around and customize your website. You can visit my personal repo for this website if you get confused or want to see something to base off of:
Build and Deployment / Custom Domains
Build and Deployment
Go to your settings for the repo and change the deployment to deploy from Github Actions, if you skip this step your website will display the "readme.md" for your website content. Once you make the change it will start displaying updates from when you push them from the command line.
Click settings:

And then click pages:
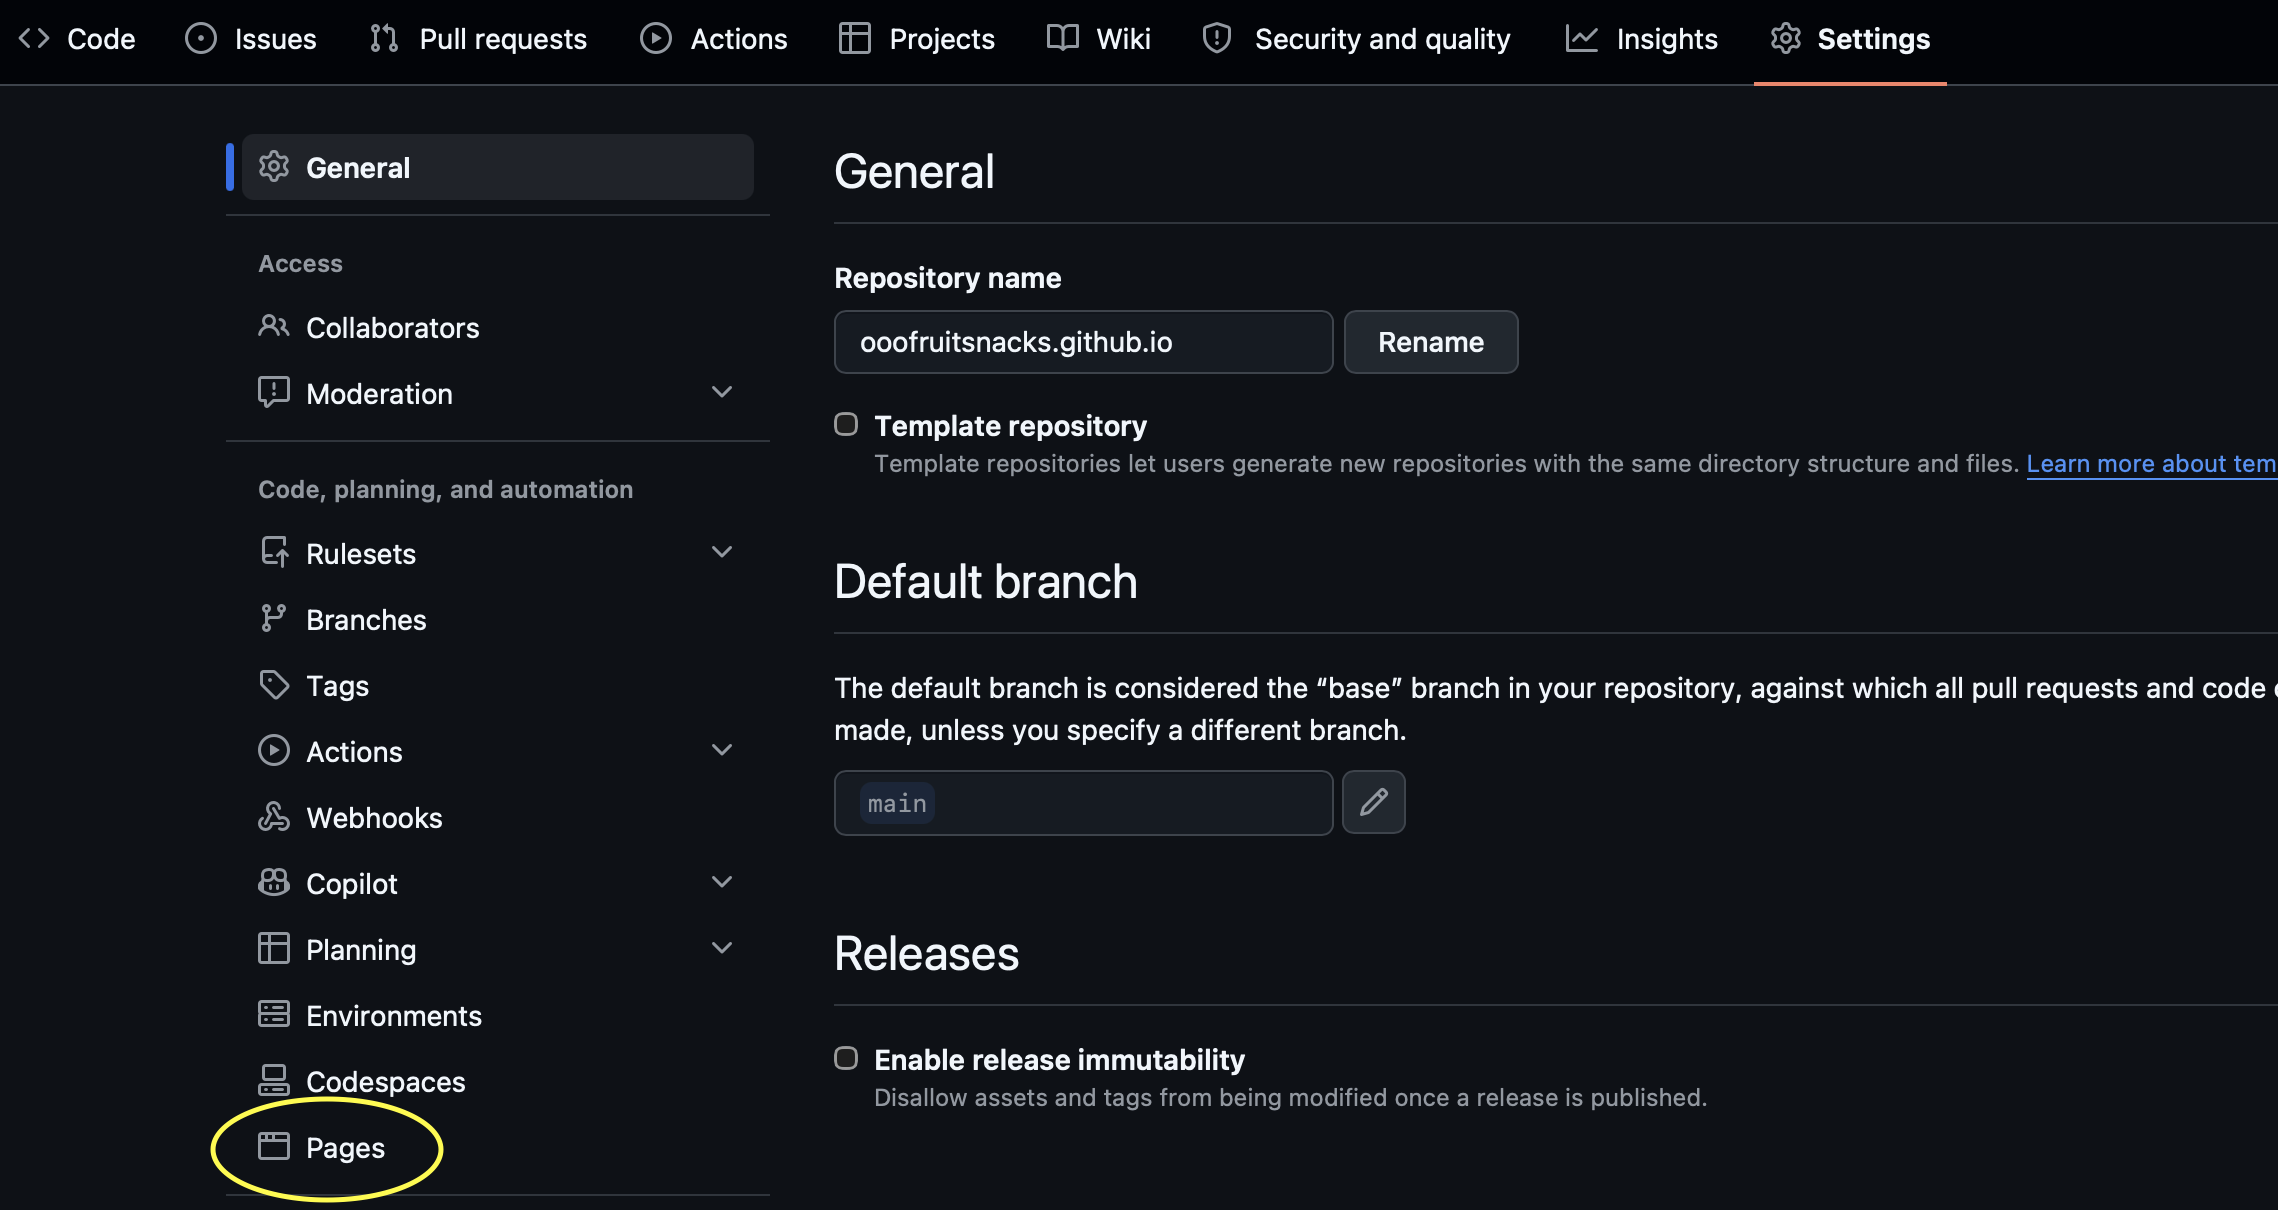
Change build and deployment to "Github Actions". Custom Domain guide is below don't skip ahead.
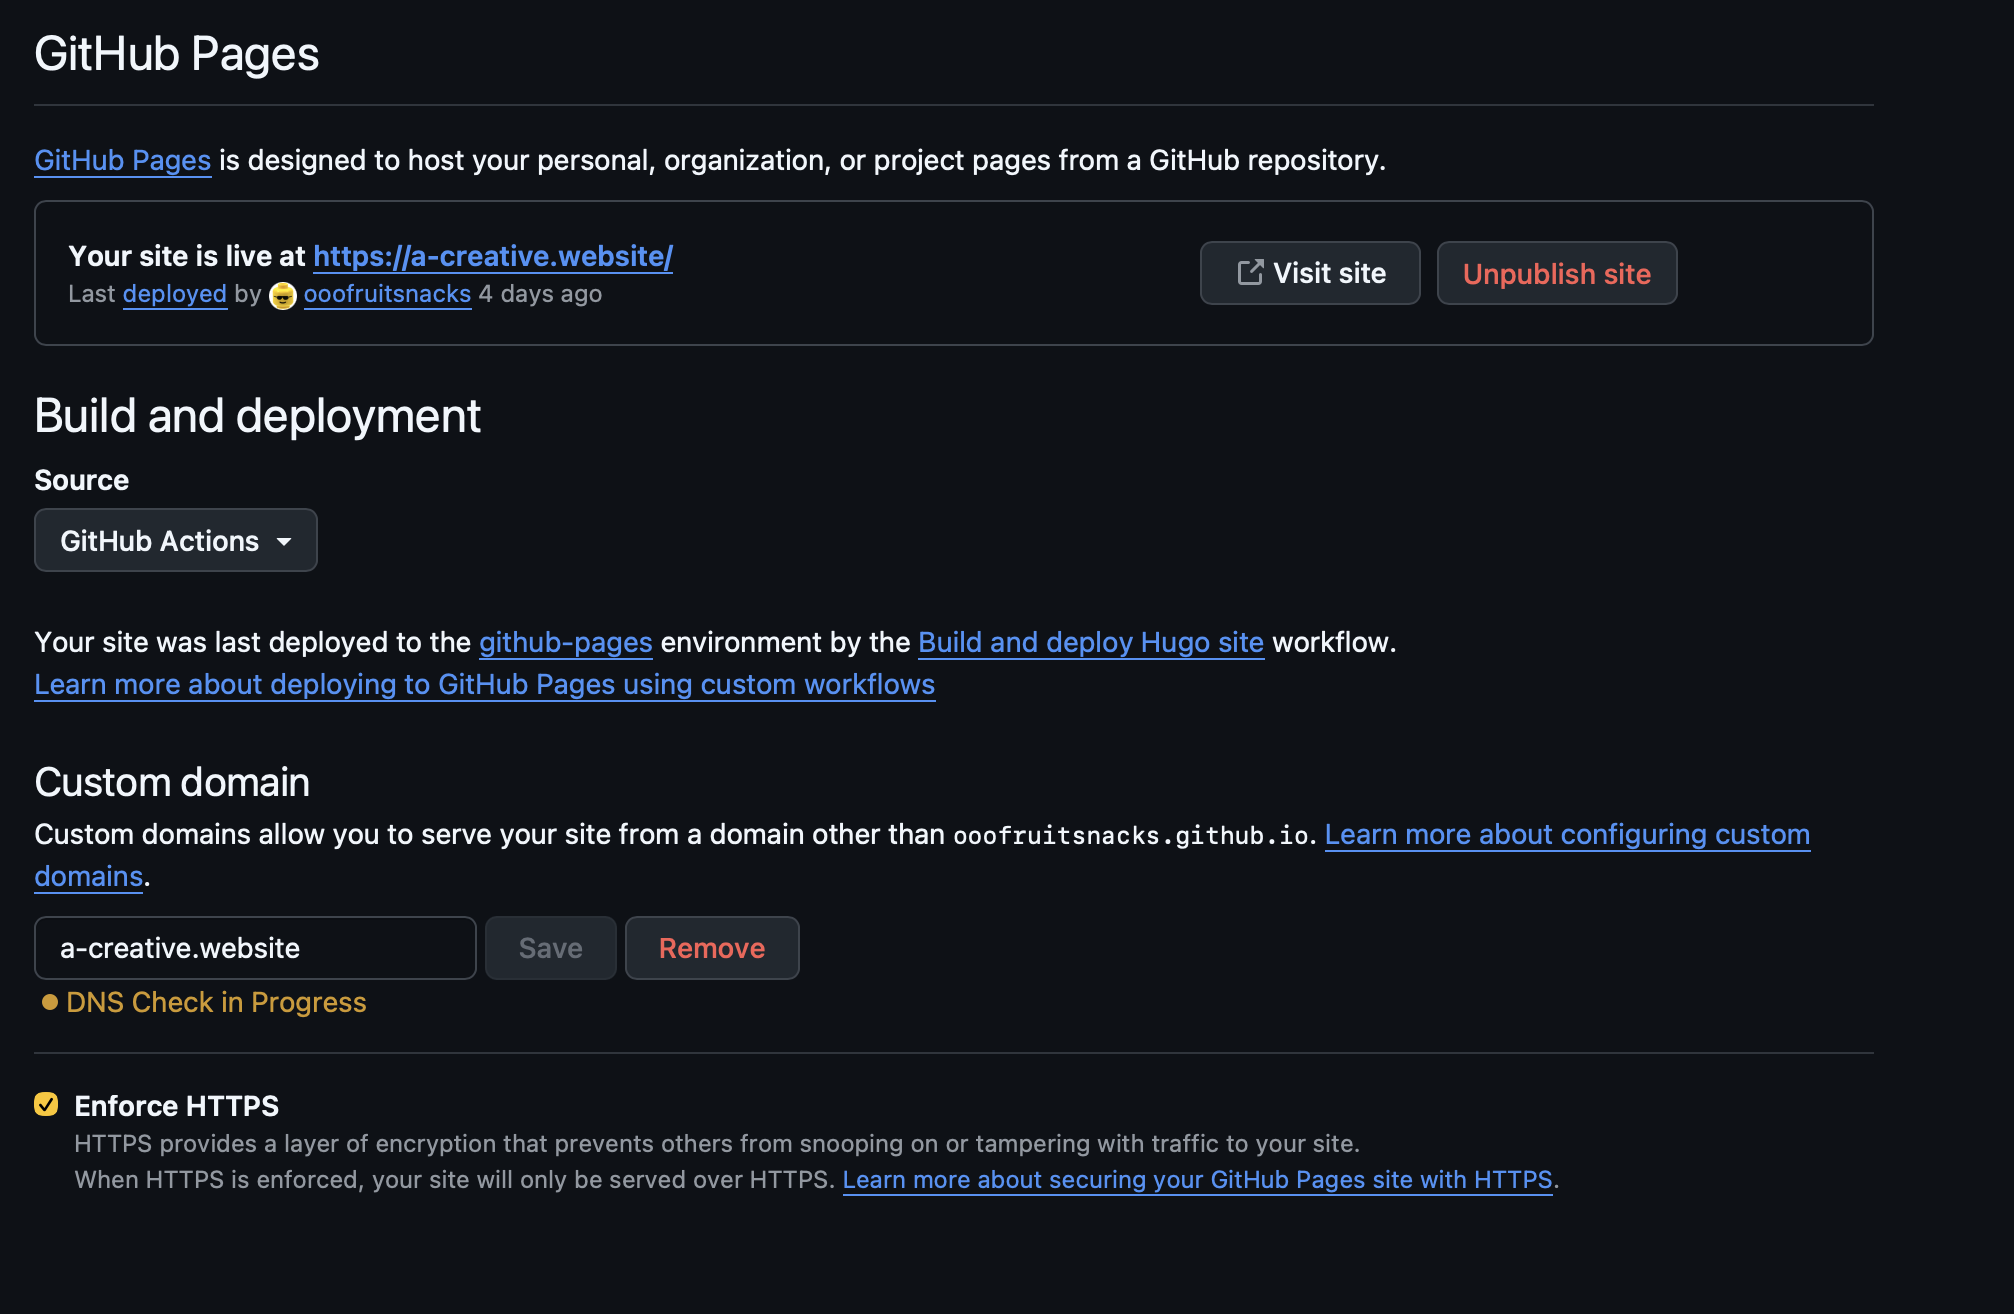
Using a Custom Domain with Github Pages
I personally use sqaurespace for my domain provider. Mainly because it's only $10 a year and it's easier to make changes. In order to make these changes, go back to the same settings tab for your repo in the step above and type in your custom domain you wish to use. If the domain check keeps failing for now don't worry.
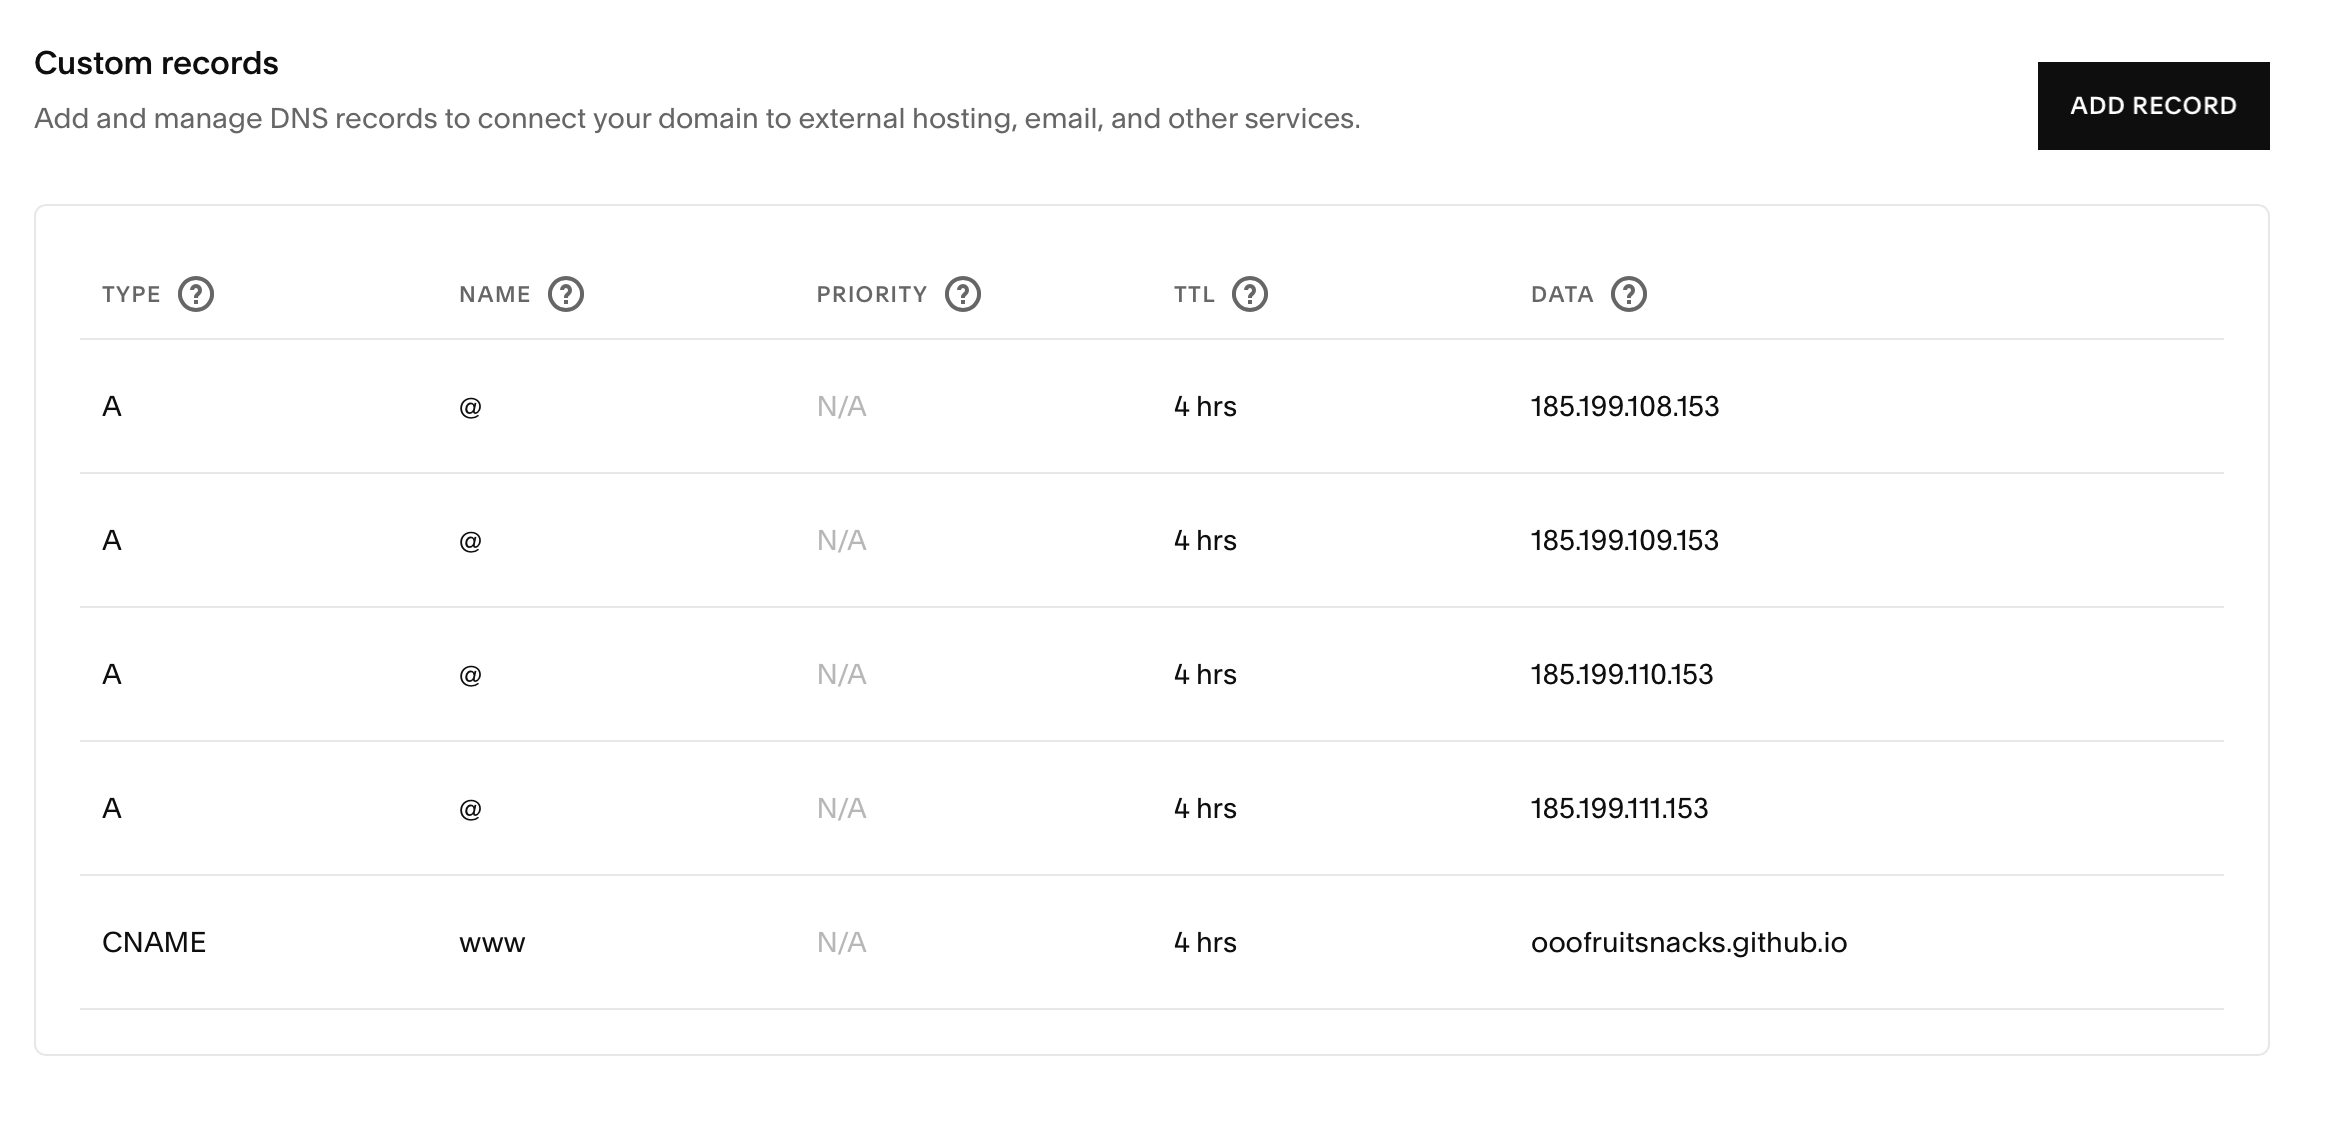
Now go to your domain provider (squarespace is mine) and find the section in your settings for DNS and open them. Delete the preapplied records and add the ones Github recommends.
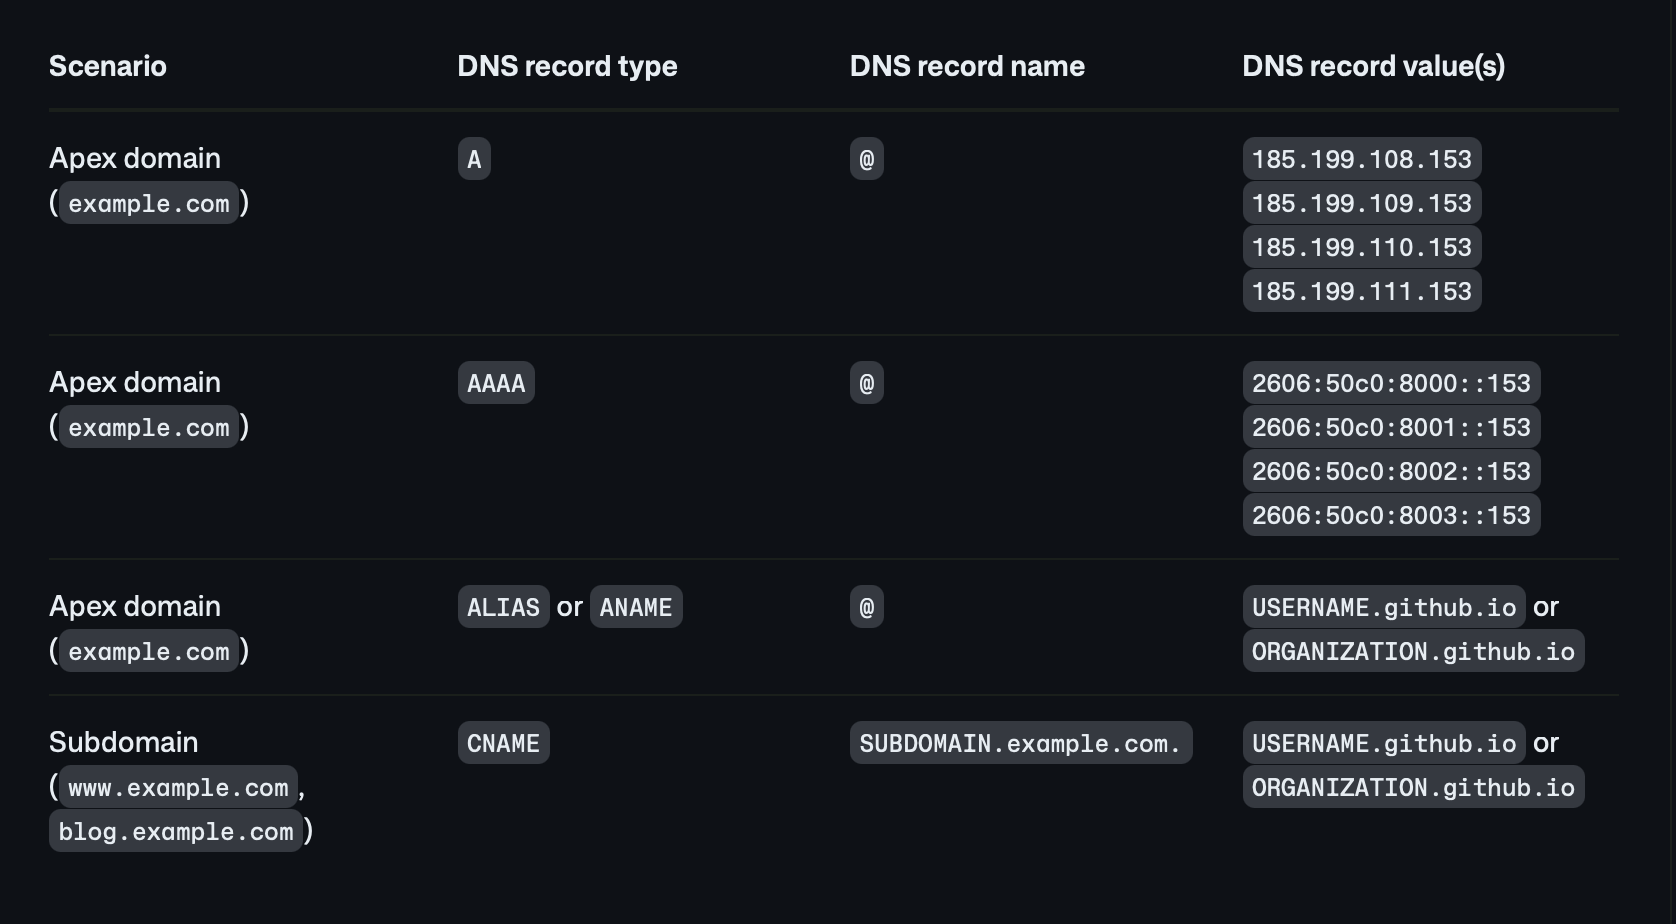
You can find the information here or just follow along below with me:
After deleting all your preapplied records, add these A name records along with a CNAME record pointing from your Github Page.
Want to check out more of my stuff?
You can go to:
Thanks!